Minimum Requirements
Attendize should run on most pre-configured LAMP or LEMP environments as long as certain requirements are adhered to. Attendize is based on the Laravel Framework
PHP Requirements
- PHP >= 7.1.3 for the master branch
- OpenSSL PHP Extension
- PDO PHP Extension
- Mbstring PHP Extension
- Tokenizer PHP Extension
- Fileinfo PHP Extension
- GD PHP Extension
MySQL Requirements
- MySQL version 5.7 or higher required
Manual Installation Steps
- Download the Latest Release or simply
git clone https://github.com/Attendize/Attendize
cd Attendize
git checkout master
into your document root on your webserver. Make sure the public folder of the project is the document root of your server e.g. /somepath/public where public is the public folder of the attendize project.
- Make a copy of the environment configuration file
cp .env.example .env - Make sure the following files/folders are writable by the webserver user.
To find out the webserver user for Apache see this server fault post
To find out the webserver user for Nginx see this server fault post
Failure to get permissions correct can cause Attendize to not work correctly. When browsing to the installer page in the last step the installer will double check permissions however if you don’t set the correct permissions below you won’t be able to get to the installer.
Change the folders below to be owned by the webserver user. www-data is used below but your web server may differ.chown -R www-data storage/app chown -R www-data storage/framework chown -R www-data storage/logs chown -R www-data storage/cache chown -R www-data bootstrap/cache chown -R www-data .envChange the folders below to have write permissions
chmod -R a+w storage/app chmod -R a+w storage/framework chmod -R a+w storage/logs chmod -R a+w storage/cache chmod -R a+w bootstrap/cache chmod -R a+w .env - Run composer to install the various libraries. You will need composer installed. Composer installation instructions can be found here
composer install - Attendize uses the Laravel framework so you need to generate an application key.
php artisan key:generate -
Create a MySQL database that you will use for your installation of Attendize. You will need to enter these details on the installation screen.
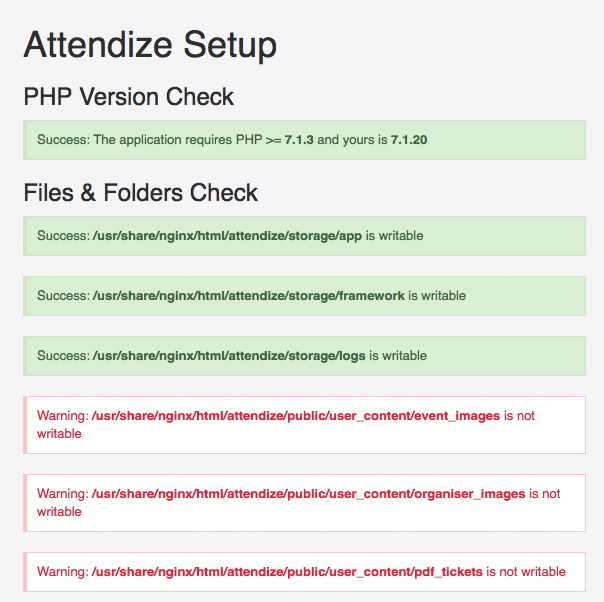
- Navigate to http://your-ticket-site.com/install and you should see the installer screen if everything is configured correctly on your webserver. If you don’t see the installer screen something is mis-configured. If you get an error on screen whoops something went wrong take a look at the log file in ./storage/logs as it will contain the error. If there is no log file again make sure that storage/logs is writable by the webserver user. Also check the webservers log file as it may contain an error message that will help with debugging. Please make sure your webserver is configured correctly to run Laravel Web applications. More details can be found here
If you do get the installer screen like below but there are errors please correct them before trying to proceed and install Attendize. Once you have corrected the errors simple refresh the page so the installer can run the checks again.
You will need to enter your database connection details and mail settings to configure Attendize correctly.
The troubleshooting guide also has tips and tricks which might help you debug your issue - troubleshooting guide
Running Attendize in Docker for development
To get developing straight away use the pre-configured Docker environment follow the steps below.
1. Download the project off Github. You will need to have git installed to clone the project.
git clone https://github.com/Attendize/Attendize
2. Change directory to the cloned codebase
cd Attendize
git checkout master
3. Use the Makefile to build the images and run the containers
make setup
At this point you should be able to browse to
https://localhost:8081/install
You can follow the web instructions to continue installing Attendize. If you are comfortable on the command line you can run Step 9 below and skip the web installer.
4. Run the command to create the various database tables
docker-compose run php php artisan attendize:install
Attendize should now be available at https://localhost:8081 and maildev at http://localhost:1080 to see the emails Attendize sends.
Which version of Attendize do I use?
To decide what version of Attendize you should use is primarily based on what payment provider you use. Attendize uses Omnipay for payment processing which is a open source payment processing framework. The laravel 5.2 branch supports Omnipay v2 and version 1.1+ supports v3 of Omnipay.
This list of supported payment gateways shows which payment gateways are supported with Omnipay v2 and Omnipay v3. If you use a payment gateway listed under Omnipay v2, use Attendize Larvel 5.2 version. If you use a payment gateway listed under Omnipay v3, use the most current release of Attendize.